Carbon MCP
Follow these steps to configure your AI application or AI agent to use Carbon MCP.
- Step 1: Using your IBMid (w3id) or functional ID
- Step 2: Getting access credentials
- Step 3: Connecting to IBM Bob and other MCP clients
- Step 4: Adding the carbon-builder skill
Step 1: Using your IBMid (w3id) or functional ID
When going through the OAuth onboarding process, you will need to authenticate with your IBMid (w3id for IBMers). If you need an IBMid, create one here.
IBM product teams also have the option of authenticating via a functional ID. If your team needs a functional ID, create one here.
Step 2: Getting access credentials
This step will launch the authorization flow to generate Carbon MCP authentication credentials, which can be provided to your MCP client.
Access request workflow
-
Visit this link to generate your token and session ID
- Request access if prompted
- Check your email for the activation link
- Copy your credentials: to add to your Carbon MCP configuration
Step 3: Connecting to IBM Bob and other MCP clients
The IBM Cloud deployment of the Carbon MCP is available at
https://mcp.carbondesignsystem.com/mcp
Here’s how to set it up in Bob and other common MCP clients:
There are two steps required to set up Carbon MCP in Bob. First, you need to install Carbon MCP from the Bob Marketplace. Then, you need to install the
carbon-builder skill
.
Step 1: Installing Carbon MCP
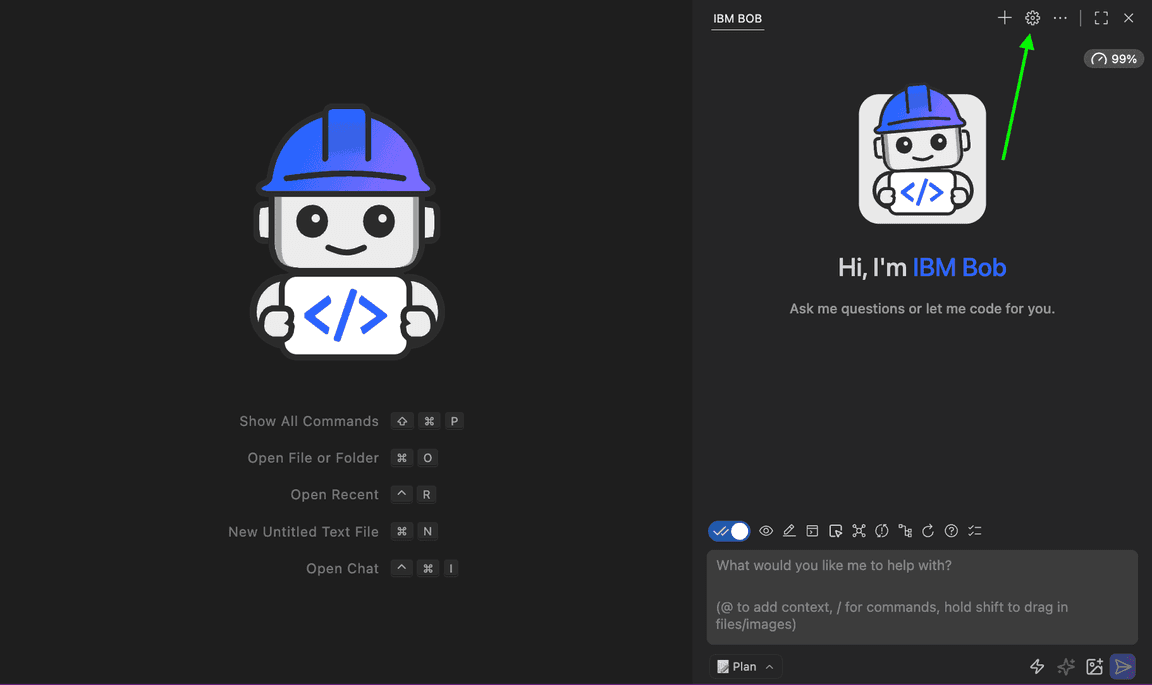
In Bob, select the settings icon in the upper right.
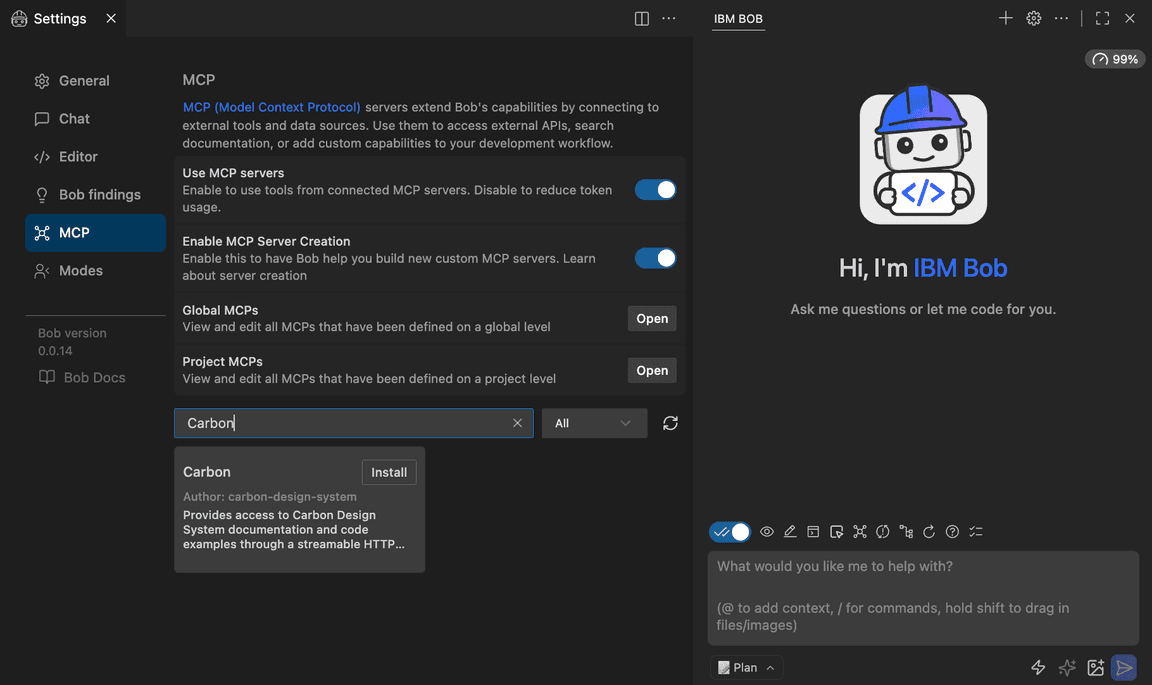
Select the MCP tab, then search for “Carbon” in the text field. Click the Install button.
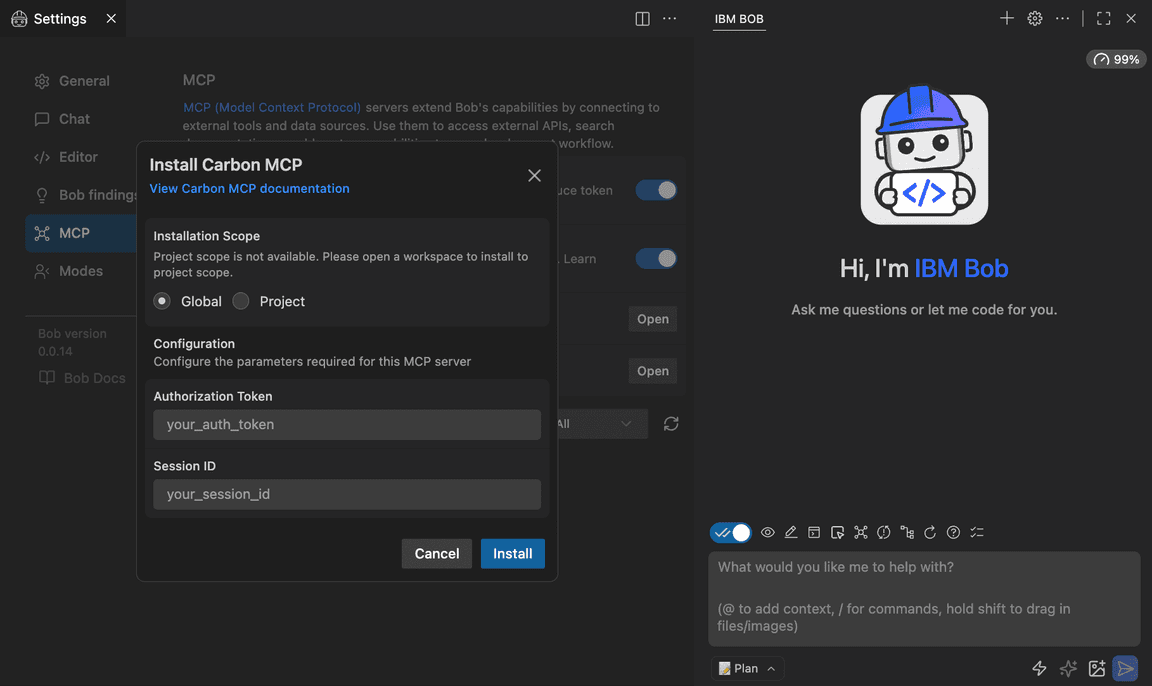
Enter your Carbon access token and session ID in the modal dialogue, then click Install.
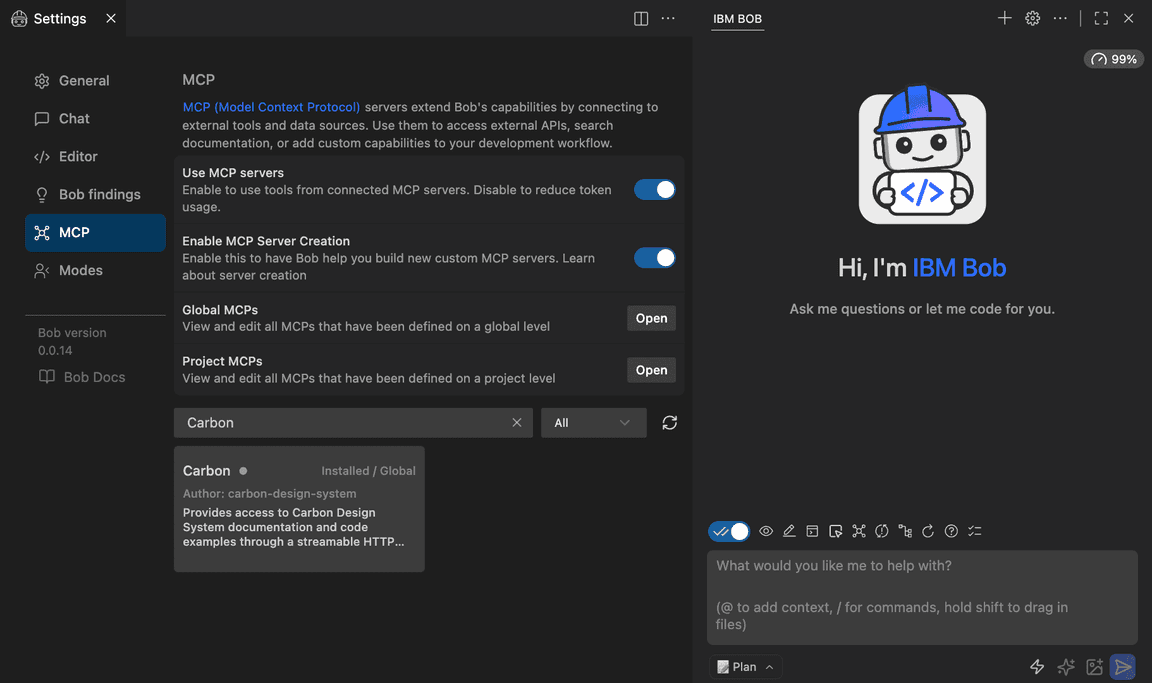
You will see a confirmation of a successful installation.
Step 2: Installing the carbon-builder skill
Now that you’ve installed Carbon MCP, you need to install the carbon-builder skill, which provides Carbon-specific guidance to help the model generate better output.
Follow the instructions in Step 4: Adding the carbon-builder skill to install the
carbon-builder skill for Bob.
- Use the Claude Code CLI and replace the and<TOKEN>with your Carbon MCP auth credentials<SESSION>
claude mcp add-json carbon-mcp '{"type":"http","url":"https://mcp.carbondesignsystem.com/mcp","headers":{"Authorization":"Bearer <TOKEN>","X-MCP-Session":"<SESSION>"}}'- Verify that Claude Code recognizes Carbon MCP by running claude mcp list
- Use the Claude Code CLI and replace the
Carbon MCP can be set up in Claude Desktop as an Extension or Custom Connector. This section describes how to make both connections.
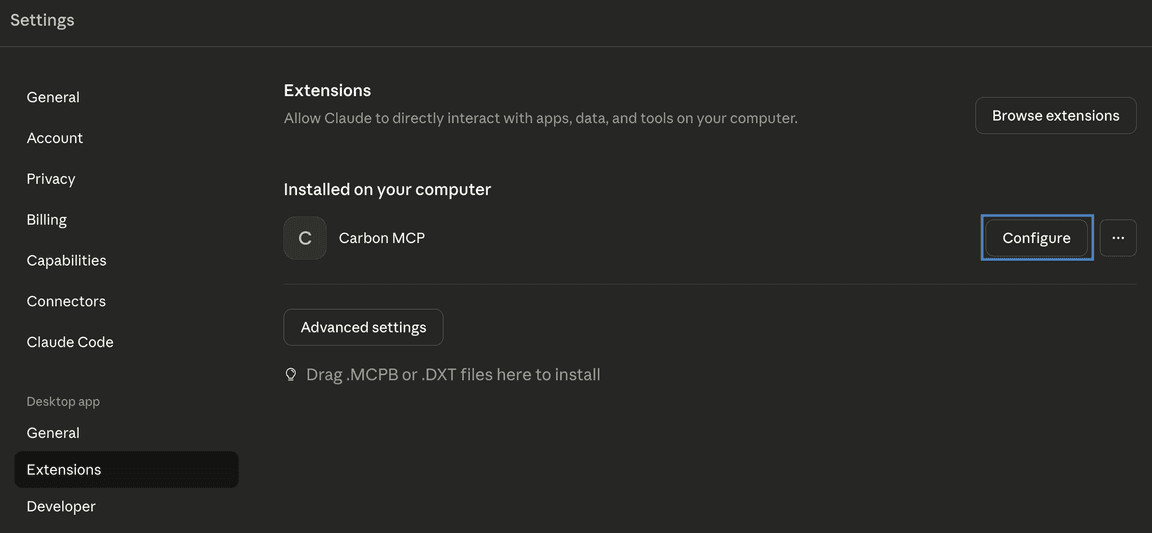
Adding Carbon MCP as an Extension
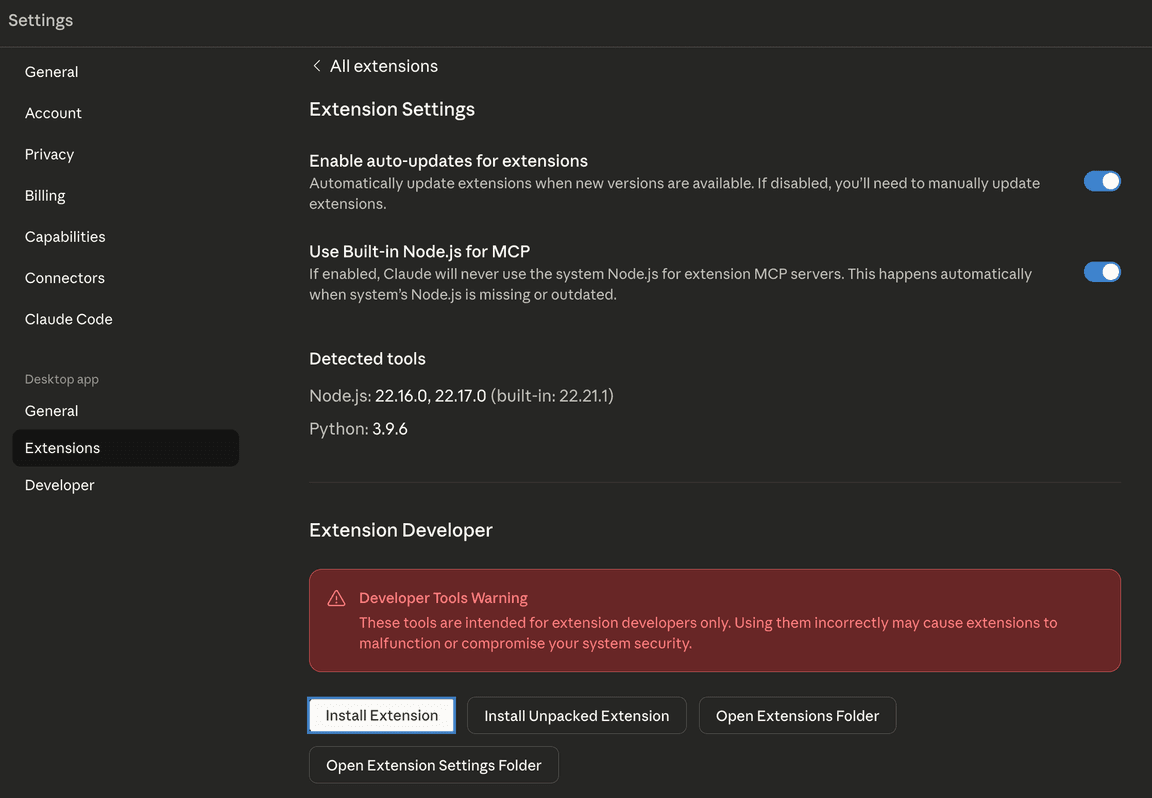
- Open Settings > Extensions > Advanced Settings
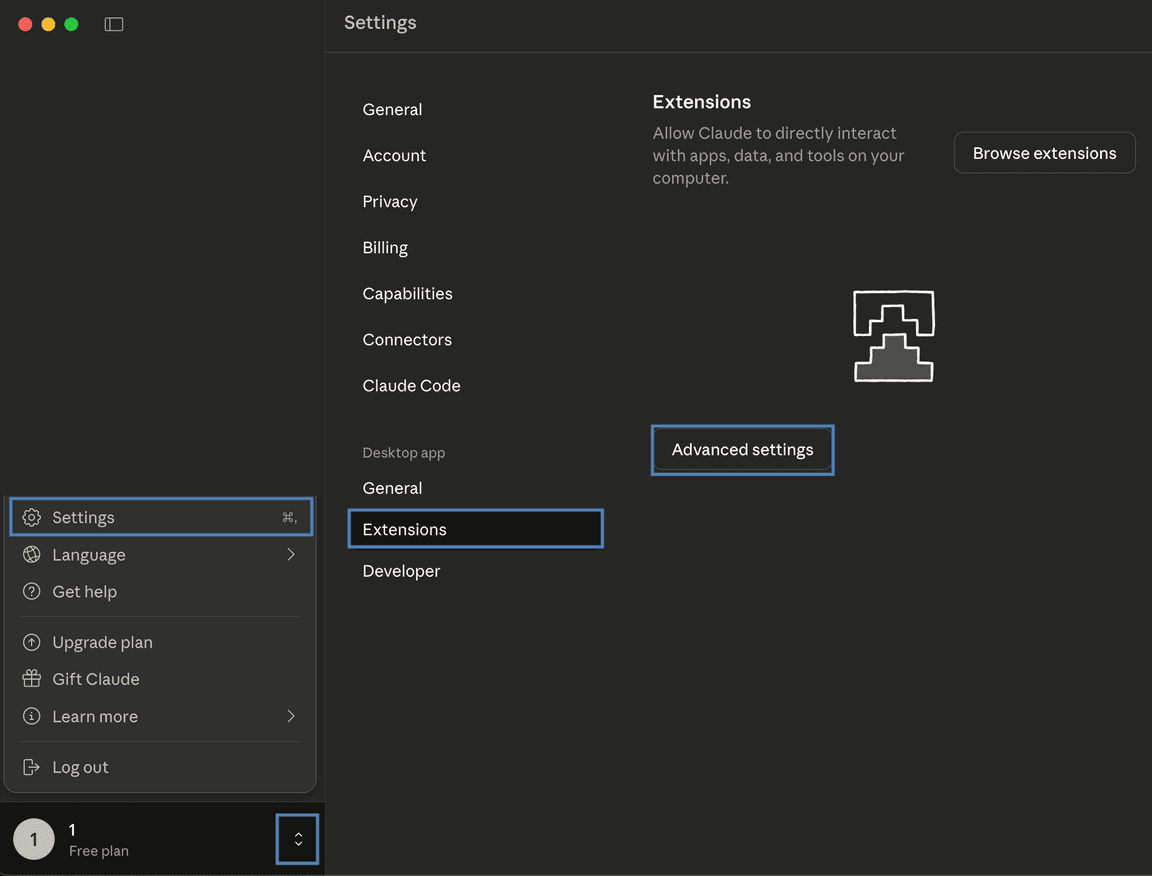
- Click Install Extension
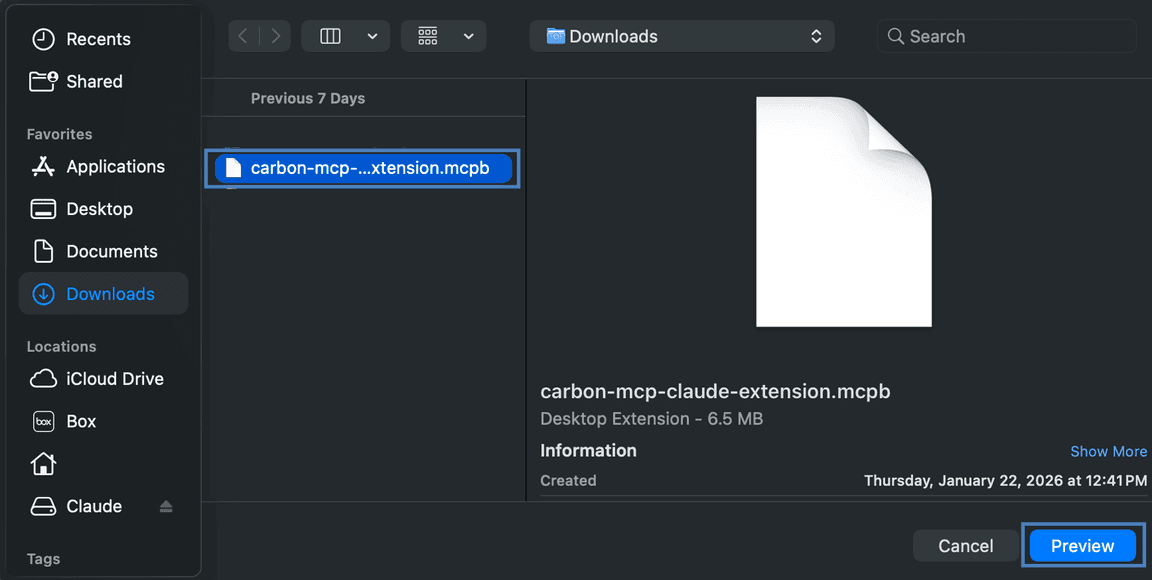
- Install the , which can be downloaded here.Carbon MCP Claude Desktop extension
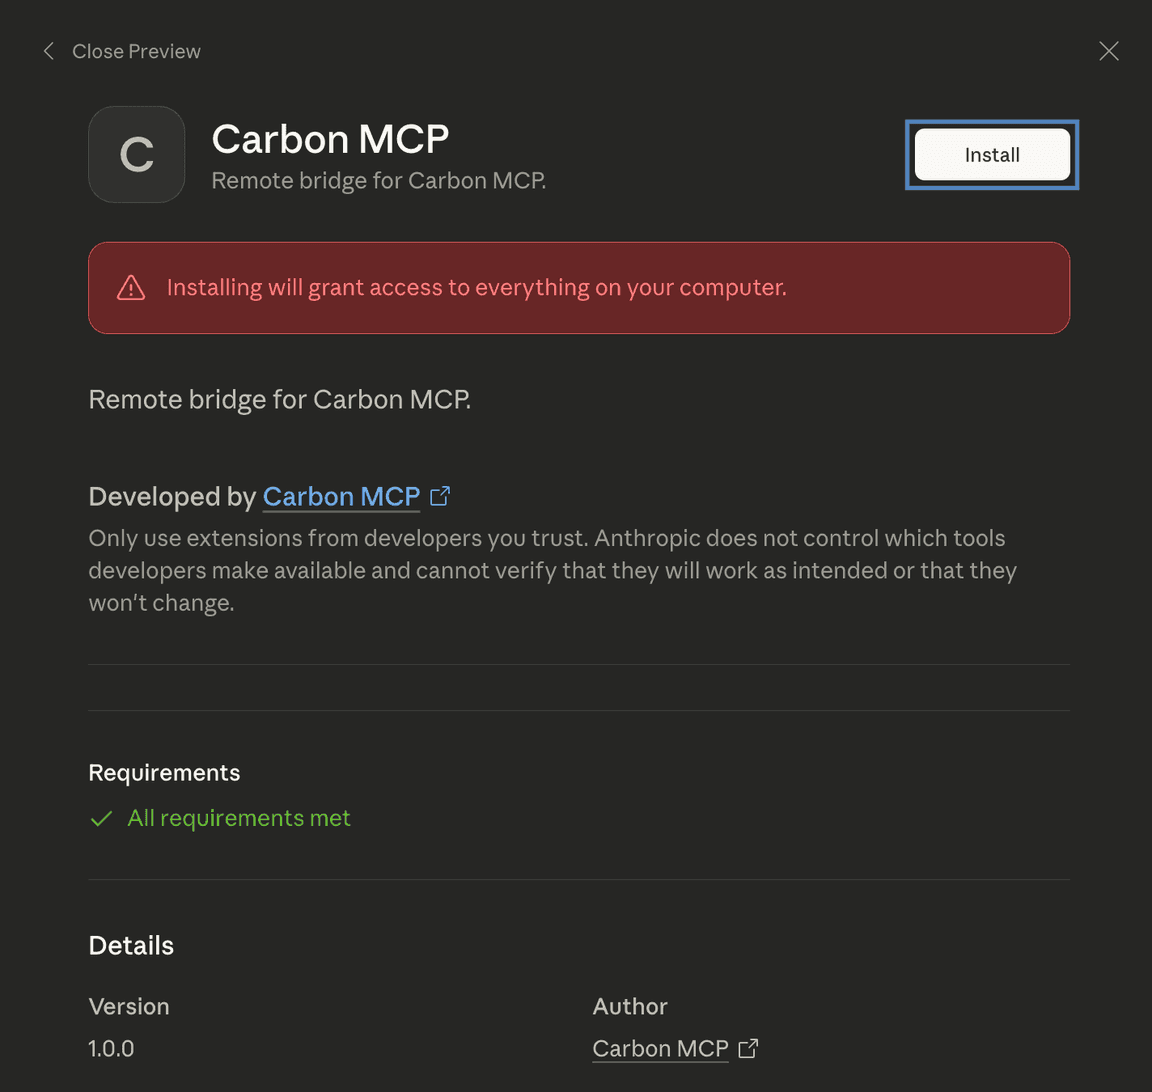
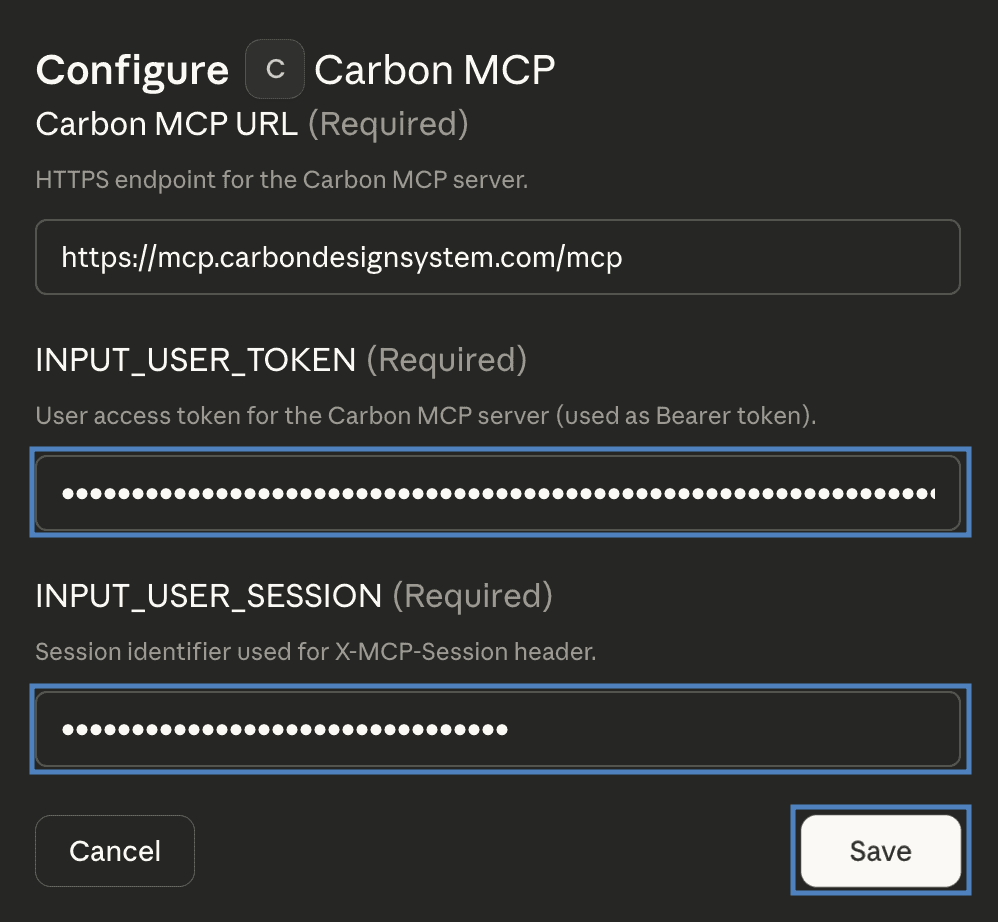
- Enter your Carbon MCP auth token and session ID in the modal, click Save to confirm.
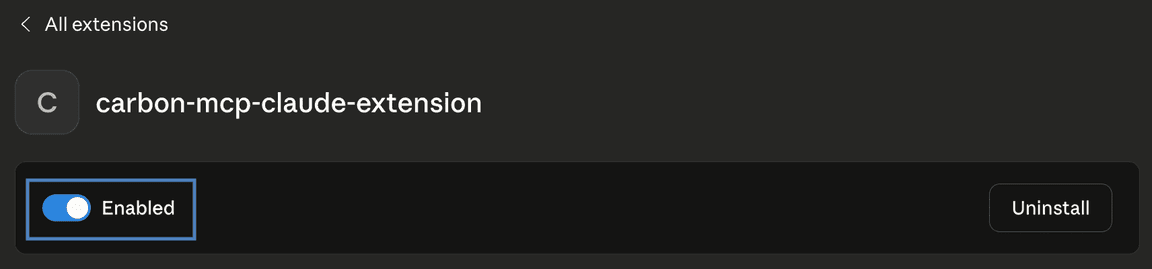
- Verify that the Carbon MCP extension is configured by ensuring the toggle is switched on and shows as Enabled.
Adding Carbon MCP as a Custom Connector
- Open Settings > Connectors
- Click on Add Custom Connector
- When prompted for a name, enter carbon-mcp
- Under the Remote MCP server URL input, use
https://mcp.carbondesignsystem.com/mcp
- Click Add
Carbon MCP can be set up in Cursor in one of the following ways:

- Use the “Add to Cursor” button shown above to automatically configure the MCP server.
- Alternatively, manually configure the MCP server by opening the Command Palette and following the steps below.

- Search for and select “View: Open MCP Settings.”
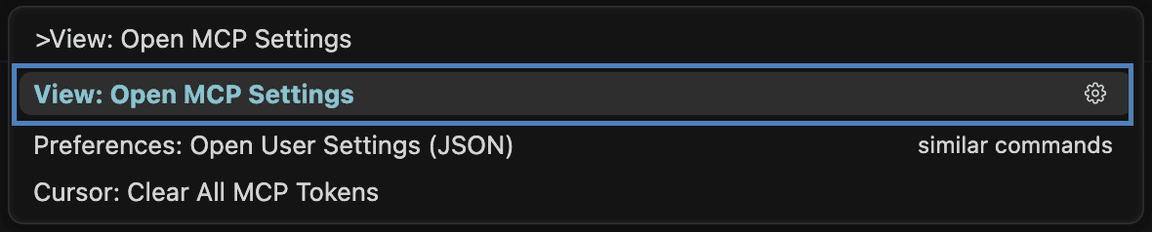
- In the MCP Settings view, click “Add Custom MCP”.
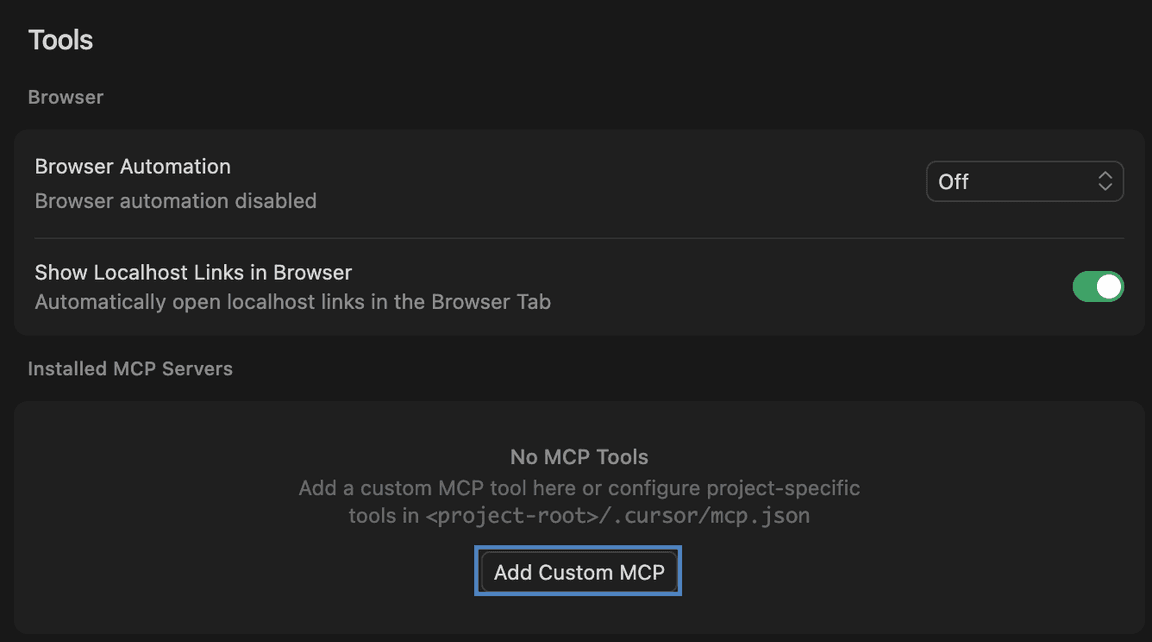
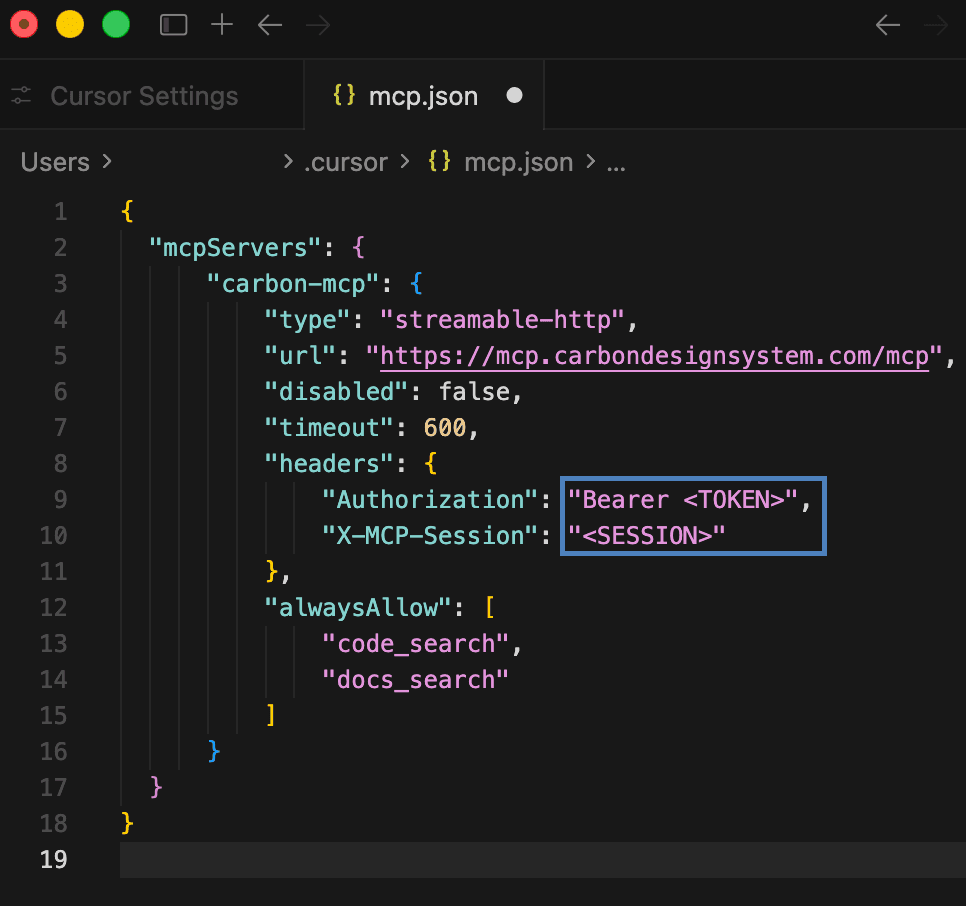
- It will open a file with your MCP servers where you can add the following configuration:
{"mcpServers": {"carbon-mcp": {"type": "streamable-http","url": "https://mcp.carbondesignsystem.com/mcp","disabled": false,"timeout": 600,"headers": {"Authorization": "Bearer <TOKEN>",- Replace and<TOKEN>with your actual Carbon MCP auth credentials. Save and close the file, then restart Cursor to apply the changes.<SESSION>
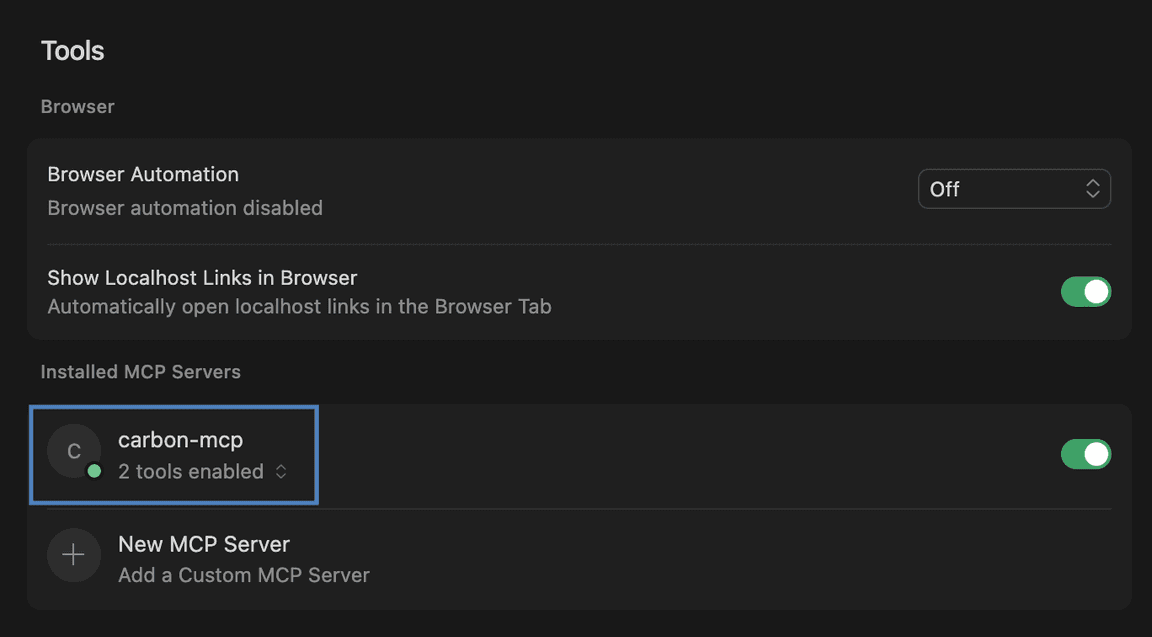
- Verify that the Carbon MCP extension is configured by ensuring the toggle is switched on and shows as Enabled.
For IBMers:
- Open Figma Make and navigate to click “Connectors”
- Select the IBM tab
- Click the Connect button next to Carbon MCP
- A browser window will open — sign in with your IBMid when prompted
- After signing in successfully, return to Figma Make. The Carbon MCP connector dialogue should still be open (if not, reopen Connectors and select the IBM tab)
- Toggle on the Enable write tools button
- For each of the following tools, open its dropdown and select Always run:
- doc_search
- code_search
- get_charts
- Click Back, then click X to close the Connectors menu
Starting your first Make with Carbon MCP:
- In Figma Make, create a new Make file
- Select a LLM model from the model selector. NOTE: Gemini was observed to consume fewer tokens, while Anthropic’s Claude Opus 4.6 model (or later) tended to produce more accurate and complete code output
- Click Add context in the chat box, then select Carbon MCP from your connectors to attach it to the session
- Paste or attach your input design (e.g. a Figma frame or image), then include the suggested user prompt in the same message and send it to begin generation
- Once generation begins, Figma Make will create an initial draft. Before accepting it, switch to the Code view (top of the Make canvas)
- Open the GUIDELINES.txt file,
copy its full contents, and paste them into in the code viewGUIDELINES.md
- Return to the chat and continue the conversation — the model will incorporate these guidelines going forward
For non-IBMers:
- Open Figma Make and navigate to click “Connectors”
- Select the Created by you tab
- Click the Create connector button
- In the Create connector dialogue, enter as the name and click Nextcarbon-mcp
- In the MCP server URL field, enter
and click Createhttps://mcp.carbondesignsystem.com/mcp
- Click the Connect button next to Carbon MCP
- A browser window will open — sign in with your Figma account when prompted
- After signing in successfully, return to Figma Make. The Carbon MCP connector dialogue should still be open (if not, reopen Connectors and select the Created by you tab)
- Toggle on the Enable write tools button
- For each of the following tools, open its dropdown and select Always run:
- doc_search
- code_search
- get_charts
- Click Back, then click X to close the Connectors menu
Starting your first Make with Carbon MCP:
- In Figma Make, create a new Make file
- Select a LLM model from the model selector. NOTE: Gemini was observed to consume fewer tokens, while Anthropic’s Claude Opus 4.6 model (or later) tended to produce more accurate and complete code output
- Click Add context in the chat box, then select Carbon MCP from your connectors to attach it to the session
- Paste or attach your input design (e.g. a Figma frame or image), then include the suggested user prompt in the same message and send it to begin generation
- Once generation begins, Figma Make will create an initial draft. Before accepting it, switch to the Code view (top of the Make canvas)
- Open the GUIDELINES.txt file,
copy its full contents, and paste them into in the code viewGUIDELINES.md
- Return to the chat and continue the conversation — the model will incorporate
these guidelines going forward
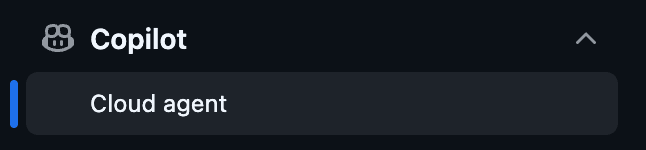
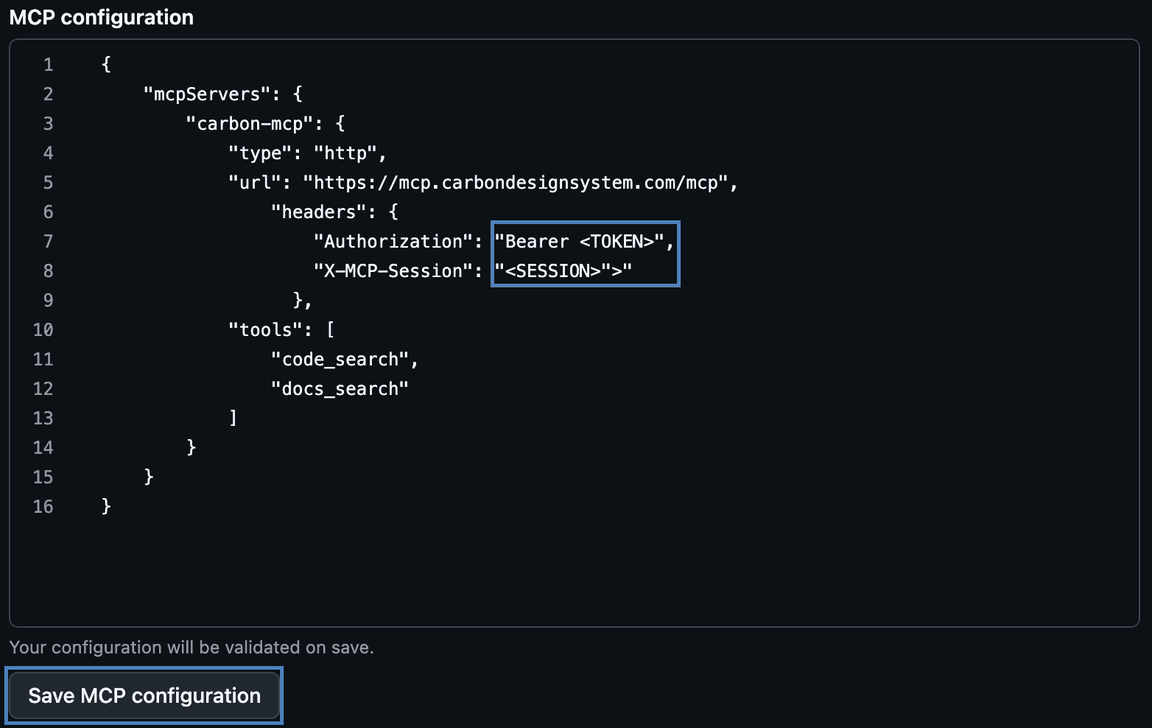
- Open your repository in GitHub and navigate to “Settings”.

- In the Settings sidebar, open Copilot and select “Coding agent”.
- Add the MCP configuration
{"mcpServers": {"carbon-mcp": {"type": "http","url": "https://mcp.carbondesignsystem.com/mcp","headers": {"Authorization": "Bearer <TOKEN>","X-MCP-Session": "<SESSION>"},- Replace and<TOKEN>with your actual Carbon MCP auth credentials, then click “Save MCP configuration”.<SESSION>
Carbon MCP can be set up in VS Code in one of the following ways:
- Use the “Install carbon-mcp” button shown above to automatically configure the MCP server.
- Alternatively, manually use VS Code CLI and replace the and<TOKEN>with your Carbon MCP auth credentials<SESSION>
code --add-mcp '{"name":"carbon-mcp","type":"http","url":"https://mcp.carbondesignsystem.com/mcp","headers":{"Authorization":"Bearer <TOKEN>","X-MCP-Session":"<SESSION>"}}'If the MCP client you are using is not listed, refer to their documentation for
and useremote serversas the URL.https://mcp.carbondesignsystem.com/mcp
Additionally, an
llms.txt
Step 4: Adding the carbon-builder skill
For best results with Carbon MCP, install the carbon-builder skill. The skill provides Carbon-specific context that guides AI agents to follow Carbon conventions, use the right components, and produce consistent output.
Follow the instructions for the clients below.
- Select the Bob mode, which is required to support skills.Advanced
- Download the carbon-builder skill and unzip it.
- Place the skill in at your project root (project-scoped) or in.bob/skills/(global).~/.bob/skills/
Bob reads
andnamefromdescriptionto determine when to activate the skill. TheSKILL.mdfiles are automatically available to Bob once the skill is active. Verify the skill is visible by runningreferences/inside Bob./list-skillsProject-scoped (recommended for teams):
mkdir -p /path/to/your-project/.bob/skillscp -r carbon-builder /path/to/your-project/.bob/skills/- Commit to your repository so the skill is shared across the team without each developer needing to install it separately..bob/skills/carbon-builder/
Global (available in all projects on this machine):
mkdir -p ~/.bob/skillscp -r carbon-builder ~/.bob/skills/- Select the Bob
Claude Code discovers skills automatically from
at your project root. No additional configuration is needed beyond having carbon-mcp configured as an MCP server..claude/skills/- Download the carbon-builder skill and unzip it.
Project-scoped (recommended for teams):
# From the directory where you unzipped the downloadmkdir -p /path/to/your-project/.claude/skillscp -r carbon-builder /path/to/your-project/.claude/skills/- Commit to your repository so the skill is version-tracked alongside the project and available to every developer on the team without a separate install..claude/skills/carbon-builder/
Global (available in all projects on this machine):
mkdir -p ~/.claude/skillscp -r carbon-builder ~/.claude/skills/Download the carbon-builder skill. No need to unzip; Claude Desktop accepts the ZIP file directly.
- Open Settings > Capabilities and ensure Cloud code execution and file creation is enabled
- Navigate to Customize > Skills
- Click the to Upload a skill and select the downloaded+carbon-builder.zip
Claude Desktop will activate the skill automatically based on its description. You can verify it appears in your Skills list and toggle it on or off from there.
Cursor uses MDC-format rule files in
..cursor/rules/-
Download the carbon-builder skill and unzip it.
-
Create the rules directory:
mkdir -p .cursor/rules- Create :.cursor/rules/carbon-builder.mdc
---description:Carbon Design System expert — activate for Carbon components, Charts, IBMProducts, AI Chat, and iconsalwaysApply: false---[paste the body of SKILL.md here — everything below the closing --- of thefrontmatter] [paste any reference file content from the references/ directoryEnsure carbon-mcp is configured as an MCP server in Cursor’s settings.
-
GitHub Copilot coding agent supports Agent Skills from your repository in
. Unlike local desktop clients, there is no global install location because the agent runs against the contents of the repository..github/skills/- Download the carbon-builder skill and unzip it.
Repository-scoped install:
mkdir -p /path/to/your-project/.github/skillscp -r carbon-builder /path/to/your-project/.github/skills/Commit
to your repository so the skill is available to GitHub Copilot coding agent when it works on issues, pull requests, or delegated coding tasks for that repo..github/skills/carbon-builder/GitHub Copilot coding agent reads the
andnamefields fromdescriptionand loads the skill automatically when the current task matches the skill’s purpose.SKILL.md- VS Code supports Agent Skills as project skills in ,.github/skills/, or.claude/skills/, and as personal skills in.agents/skills/,~/.copilot/skills/, or~/.claude/skills/.~/.agents/skills/
- Use in your repository if you want the skill to be shared with your team. Use.github/skills/if you want it available across all of your local projects in VS Code.~/.copilot/skills/
- Download the carbon-builder skill and unzip it.
Project-scoped (recommended for teams):
mkdir -p /path/to/your-project/.github/skillscp -r carbon-builder /path/to/your-project/.github/skills/- Commit to your repository so the skill is version-tracked and available to other developers using VS Code on the same repo..github/skills/carbon-builder/
Global (available in all projects on this machine):
mkdir -p ~/.copilot/skillscp -r carbon-builder ~/.copilot/skills/To verify the skill is available in VS Code:
- Open the Command Palette and run Chat: Open Chat Customizations
- Open the Skills tab and confirm appears in the listcarbon-builder
- Or type in chat to open the skills menu/skills
VS Code reads the
andnamefromdescriptionand loads the skill automatically when it is relevant to the current task.SKILL.md- VS Code supports Agent Skills as project skills in
If your MCP client is not listed above, refer to its documentation for installing skills.
Most agent tools that support custom instructions load context from a Markdown file or a dedicated directory at the project root. Common patterns include:
-
A single instructions file such as
,AGENTS.md, orAGENT.md.agent/instructions.md -
A rules or skills directory such as
,.agent/skills/, or a client-specific equivalent.rules/ -
Download the carbon-builder skill and unzip it.
-
To install the carbon-builder skill in any of these clients, paste the body of
(everything below the closingSKILL.mdof the frontmatter) into the appropriate file. If the client supports a directory of files, copy the---folder there. Refer to your client’s documentation for the exact path and format it expects.carbon-builder/
-